

To get the nose attached without removing the solid plastic secondary bumper I did need to "trim" the solid plastic bumper slightly. Filing and sanding about 6mm out of the front of the bumper just where the headlight recess on the nose section touches the bumper.
With the secondary bumper trimmed the nose section then sat back enough so that it aligned better with the bonnet and guards. However, I found that the whole nose section sat a bit high if it was mounted using the top fibreglass tabs provided. So, I had to fabricate a new adaptor bracket that allowed the whole nose section to sit about 10mm lower - you can see in the photo below (red arrows) that the right and left hand tabs now sit under the mounting point that they'd normally be bolted on top of.


Secondary bumper 'trimmed' and nose section mounted at the correct height, I then made some brackets to mount on top of the secondary bumper so that the nose could then be attached to them at this point as well.
A couple of strategically placed bolts then secured the front of the nose cone to the brackets on the secondary bumper (see red arrows in image below).

So, the nose is attached by the new bracket and fibreglass tabs at the top, the two bolts beside the headlights that attach to the new brackets on the secondary bumper, a couple of bolts that attach the lower 'lip' of the nose section to the splitter (plastic air dam and pan below and in front of the radiator), and the sides attached to the front bottom of the wheel arch (actually, you can see the wheel arch tab by the brake rotor in the photo below). Not as many attachment points as I expected (altough the original bumper didn't have any more), but all feels nice and secure.
Now remember in Nose Fitting Part 1 I mentioned that I thought that the nose section would need to have a vee cut out on either side to fit the right and left hand front guards (or I think some call them fenders)?
 Well, turns out that the nose section fits around those pointed vees on the guards/fenders (side profile photo on left).
So, I will have to build out the guards/fenders with filler (need to Google now to find out how to do this professionally, well semi-professionally anyway 😀) - see pictures of left and right guard/fender to nose section alignment below.


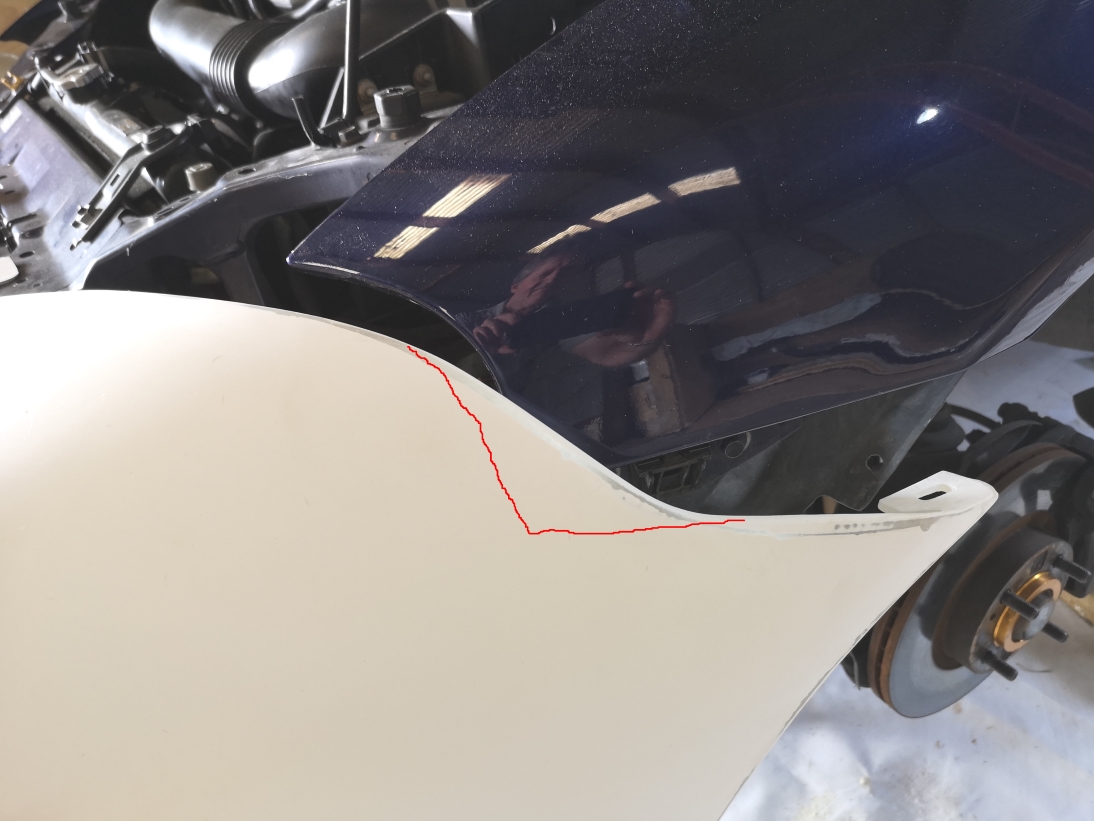
Other filling required is to add thin strips (5 to 7mm) of fibreglass to the nose section to close up the gaps between the nose section and the bonnet (hood) - see photo below.

While I'm fibreglassing the gaps I also want to add some fibreglass reinforcing to a couple of areas where I think the nose section could be a bit weak and break (NZ roads being a bit bumpier than Japan's I expect 😁). Especially on the rear mounting points where the nose section attaches to the front-bottom of the wheel arch.
So, it's coming along. Once the above filling and reinforcing is done then I can remove it all and seal and paint the inside of the nose section before final (hopefully) mounting. Hopefully, Part 3 will see a completed nose section, ready for the lights to be mounted. Catch ya then.
Comments
Post a Comment